Wondering how to change an ATV tire? This guide will walk you through five simple steps to get it done quickly and safely at home.
High-Level Step By Step Guide
- Gather Tools: Make sure you have everything from a valve core tool to tire irons to an air compressor.
- Setup Safely: Park your ATV on a flat surface, engage the parking brake, and carefully jack up your atv.
- Remove the Wheel: Loosen lug nuts, jack up your ATV, and remove the wheel safely.
- Deflate the Tire and Break the Bead: Remove the valve core, let the air out, and separate the tire bead from the rim.
- Remove Old Tire: Use tire irons to work the tire off the rim, using soapy water or tire lube to ease the process.
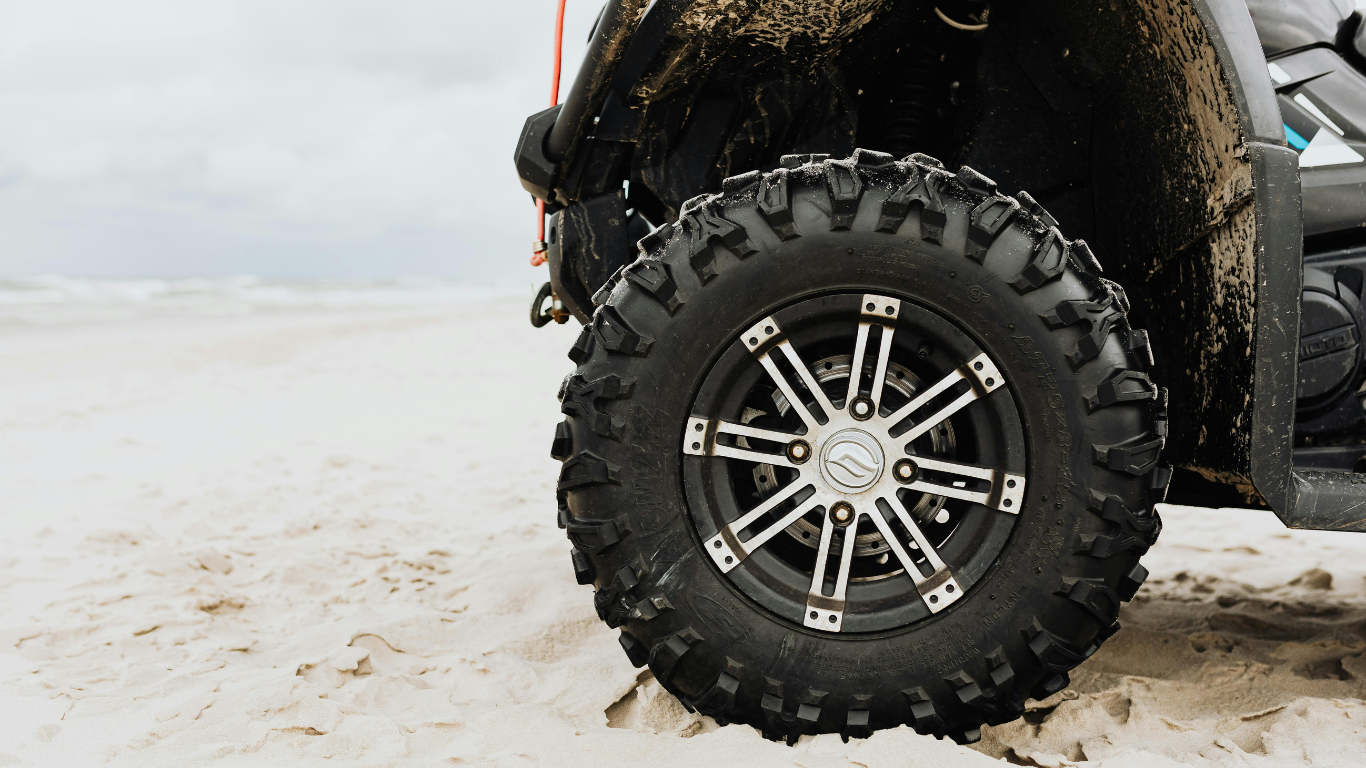
- Mount New Tire: Lubricate the bead, position it correctly (watch for direction!), and use irons carefully to avoid damaging the bead. This step is crucial when you mount ATV tires to ensure they are properly seated.
- Seat the Bead and Inflate: Use an air compressor to pop the beads into place, checking to ensure they seat properly and inflating to the correct PSI.
- Reinstall the Wheel: Tighten lug nuts in a star pattern, lower the ATV, and torque the lugs to spec.
- Check Everything: Spin or move the tire to ensure a good seal, and test-ride the ATV.
1. Tools and Equipment You’ll Need

- New ATV Tire: Make sure it matches the size and tread type recommended for your ATV. Check your owner’s manual or the sidewall of your current tire to confirm.
- Valve Core Removal Tool: This small tool helps you remove the valve core so you can let all the air out.
- Tire Irons or Tire Spoons: These are sturdy metal levers designed to help pry the tire bead over the rim lip without causing damage.
- Bead Breaker (Optional but Handy): Sometimes the tire bead can be really stuck to the rim. A bead breaker helps “pop” it loose. If you don’t have one, you can improvise, but be careful.
- Tire Machine (Optional): A tire machine can make the process of mounting and dismounting ATV tires much easier and more efficient, especially if you plan to do this regularly.
- Lubricant (Soapy Water or Tire Lube): Tire shops use a special lube, but a bit of dish soap mixed with water works almost as well. This helps the tire bead slide off and on.
- Air Compressor: You’ll need a decent compressor to seat the bead and inflate the tire properly. A simple hand pump usually won’t cut it if the bead is stubborn.
- Jack or Lift: You’ll have to lift the ATV to remove the wheel. Make sure whatever jack you have can handle your ATV’s weight safely.
- Socket Wrench or Lug Wrench: This is to remove the lug nuts holding the wheel on.
- Torque Wrench: When you reinstall the wheel, you’ll want to torque the lug nuts to the manufacturer’s recommended specs.
- Protective Gear: At the very least, gloves and safety glasses. Tire irons can slip, so protect yourself from flying debris or pinched fingers.
Gathering all of this beforehand will make the job run smoother. Trust me, nothing’s worse than being halfway through a tire swap and realizing you don’t have a crucial tool.
2. Setting Set Up Safely

Whenever you’re wrenching on your ATV, it’s smart to take some safety precautions. Here’s what I usually do before diving in:
- Choose a Flat Surface
Make sure your working area is flat and solid. Sloped driveways or uneven ground can be risky once you’ve got the ATV jacked up. - Secure the ATV
Use the parking brake or chock the other wheels so the ATV won’t roll. Then, place the jack under a strong point of the frame. Once the wheel is off the ground, support the ATV with a jack stand or a sturdy block. You never want to trust the jack alone. - Follow Any ATV-Specific Guidelines
If your ATV has any unique quirks, your owner’s manual is the best place to confirm lifting points, lug nut torque settings, and recommended tire pressure.
Being safe isn’t rocket science, but it’s easy to forget the little steps that keep you from getting hurt. A few extra minutes of prep time will be worth it.
3. Remove the Wheel
Alright, let’s do this. Time to get that worn-out (or damaged) tire off so you can put on the fresh one.
Step 1: Loosen the Lug Nuts – While your ATV is still on the ground, use your socket wrench or lug wrench to break the lug nuts loose. Don’t remove them completely yet—just get them started so they’re easier to remove once the wheel is elevated.
Step 2: Jack Up the ATV – Position the jack under a stable spot on the frame. Lift the ATV just enough so the tire you’re working on is off the ground. Slide a jack stand or solid block underneath for added security.
Step 3: Remove the Wheel – Now you can finish unscrewing the lug nuts. Keep them in a safe spot (it’s really easy to misplace these little things). Gently pull the wheel away from the hub. If it’s stuck, tap around the backside of the tire with your hand or a rubber mallet to break any rust or dirt holding it in place.
4. Deflate the Tire and Break the Bead
Step 1: Deflate the Tire
Time to take out the valve core using the valve core removal tool. It might hiss and release air quickly, so don’t lean in too close. Once that’s done, your tire is basically just a floppy ring of rubber around the rim, which makes the next steps easier.
Step 2: Break the Bead
This is usually the tricky part, especially with off-road tires. The bead is the edge of the tire that seals against the rim. If you have a bead breaker, position it according to its instructions and apply steady pressure until you hear or see the bead pop loose. If you don’t own a bead breaker, you can try other methods:
- Using a C-clamp: Tighten it around the sidewall near the rim to push the bead down.
- Carefully using another vehicle’s tire: Sometimes, you can place the ATV tire flat on the ground and slowly drive a car tire onto the sidewall (away from the rim) to break it loose.
Do this on both sides of the tire. It can require patience (and sometimes a little creativity) to get that bead to separate.
5. Remove the Tire from the Rim
Now that the bead is loose, spray or brush some soapy water all along the rim edge to help things slide. Wedge a tire iron between the tire and rim, and gently pry the bead up and over the rim lip. Keep one tire iron in place to hold it, then work a second iron around the circle. Once the first side is off, flip the tire and do the same to get the second side free. It might feel like a puzzle the first time you do it, but you’ll get the hang of it.
Take a moment to wipe away any dirt or debris on the rim once the tire is removed. You’re officially halfway there.
6. Mounting the New ATV Tire

Now for the fun part: seeing that fresh rubber on your rim.
Step 1: Inspect and Clean the Rim
Before you do anything, check the rim for any damage like cracks or deep gouges. A damaged rim can lead to air leaks or even dangerous blowouts on the trail. If everything looks good, give it a good wipe-down so you have a clean surface for the new tire to seal against.
Step 2: Lubricate the Tire Bead
Grab that soapy water (or commercial tire lube) and coat the tire bead. This helps the bead slide more easily over the rim and reduces the risk of tearing the rubber.
Step 3: Check Tire Direction
Many ATV tires have a directional tread pattern. Look for an arrow on the sidewall indicating the proper rotation. Make sure the tire is oriented correctly based on how it will spin when the ATV moves forward.
Step 4: Mount the First Bead
Push one side of the tire onto the rim. Often, you can press it on by hand if you have enough lube and a bit of body weight. If it’s stubborn, use the tire irons to help pry it over, but do this gently—take small bites around the rim instead of one big chunk.
Step 5: Mount the Second Bead
Getting the second bead over the rim lip can be a bit more challenging because the tire walls are already half on. Use your tire irons and keep applying a bit of lube if needed. Move slowly around the rim, pulling the bead over in small increments. Once the entire bead is over, the tire should sit loosely on the rim.
Step 6: Valve Stem Check
Make sure you haven’t pinned or twisted the valve stem (if it’s separate). You don’t want to trap or kink it under the bead. If your rim has a built-in valve stem, just ensure it’s still accessible and not being squished in some awkward angle.
7. Seat the Bead and Inflate
After both beads are on the rim, the next step is to get them sealed properly, which is known as “seating the bead.”
Step 1: Get Ready to Inflate
Attach your air compressor hose to the valve stem. Some people remove the valve core again so you can get a bigger rush of air into the tire right away—this can help the bead pop into place more easily. However, you can do it with the valve core in; it might just take a bit longer.
Step 2: Inflate in Short Bursts
Turn on the compressor and start adding air. If the bead is not seating properly, you can use a ratchet strap around the tire to help close the gap between the tire and rim, allowing the beads to seat properly during inflation. You might need to gently press or pull on the sidewalls to help them line up with the rim edge. If it’s not seating, add a touch more soapy water around the bead. Sometimes, a firm push or two on the tire helps it pop. You’ll usually hear a pretty distinct “pop” or “ping” when each side seats properly.
Step 3: Monitor Your Air Pressure
The moment you hear the bead pop into place, stop inflating for a second and check the pressure. ATV tires generally run at a much lower PSI than car tires, often anywhere from 5 to 14 PSI (depending on the model). You don’t want to overinflate and risk damaging your brand-new tire or the rim.
Step 4: Final Pressure Adjustment
Once both beads are seated, put the valve core back in (if you removed it) and inflate or deflate to the recommended PSI. You can usually find this in your ATV manual.
Give the tire a once-over to make sure everything looks even and properly seated. If it all checks out, you’re good to go.
8. Reinstall the Wheel
With a fresh tire secured on the rim, you’re almost done. Time to get the wheel back on your ATV.
Step 1: Line Up the Wheel
Lift the wheel onto the hub, matching up the lug holes with the studs. Thread the lug nuts on by hand first to avoid cross-threading.
Step 2: Tighten Lug Nuts in a Star Pattern
Using your socket or lug wrench, snug each lug nut in a crisscross (star) pattern. This makes sure the wheel sits flush against the hub. Don’t fully crank them down yet—just get them fairly tight.
Step 3: Lower the ATV
Slowly lower the jack until the tire touches the ground. Remove your jack stand or block, and set the ATV fully down.
Step 4: Torque the Lug Nuts
Now grab your torque wrench. Check your ATV’s manual for the correct torque specification for the lug nuts. Tighten them in the same star pattern until you hear or feel the correct torque level. Over-tightening can stress the studs, and under-tightening can lead to a wheel coming loose. Not a fun scenario on the trail.
9. Check Everything
Give the tire a gentle shake to make sure it’s secure, and confirm you’re at the recommended PSI. If you’re replacing more tires, repeat the process for each one. Otherwise, you’re good to go!
Final Tips and Maintenance
Learning to change an ATV tire can feel like a small milestone. Once you do it a couple of times, you’ll realize it’s not that big a deal—and you’ll wonder why you ever paid someone else to do it. Here are a few extra pointers to keep in mind:
- Balancing (Optional)
Many riders skip tire balancing for ATVs, especially if most of their riding is on rough terrain or at lower speeds. But if you’re noticing a wobble on hard-packed roads, you could look into balancing the tires or using tire-balancing beads. - Check Tire Pressure Regularly
ATV tires often run on lower pressure, so they can lose air faster than you might expect—especially if you’re riding on rough trails. Get in the habit of checking your PSI before each ride. - Inspect for Damage
Give your tires a quick visual once-over for any nails, tears, or bulges. Early detection of these problems can save you from a more expensive repair or dangerous blowout.
Frequently Asked Questions
Do I need special tools, or can I get by with what I have at home?
While you can sometimes improvise with what’s in your toolbox (like using large screwdrivers instead of tire irons), specialized tools really help. A bead breaker makes separating the bead a lot less frustrating, and tire irons (or tire spoons) are designed to avoid damaging the rim. If you plan on changing ATV tires regularly, investing in these specific tools will save you a ton of hassle (and possibly money) in the long run.
What if the bead won’t seat, no matter how much I try to inflate it?
First, check that both the tire and rim are clean and well-lubricated with soapy water or tire lube. If there’s still a gap, gently manipulate or push the tire sidewalls outward to help them seal. Sometimes removing the valve core allows a bigger burst of air to get the bead to pop into place. If you’re really stuck, try ratchet-strapping the circumference of the tire to push the sidewalls outward before inflating—just be careful and release the strap once the bead starts to seat.
Can I reuse my old valve stem, or should I always replace it?
If your current valve stem is in good shape (no cracks or damage) and it’s sealing properly, it can be reused. However, valve stems are inexpensive, and replacing them can save you from slow leaks down the road. Many riders choose to replace the stem anytime they swap tires just for added peace of mind.
Do I need to balance my new ATV tires?
ATV tires usually operate at lower speeds and on rough terrain, so many riders skip formal balancing. However, if you often ride on hard-packed surfaces or notice any wobble or vibration, you might want to consider balancing. Some people use professional balancing services, while others use bead balancing kits (small beads inside the tire that automatically distribute themselves). It’s not always necessary, but it can help with a smoother ride if you’re sensitive to vibrations.
How do I know if my rim is too damaged to reuse?
Look for cracks, deep gouges, or significant bending. If the rim is bent enough that you can see a gap or if there’s a crack along the lip or spoke area, it may not be safe to repair. Minor dings can sometimes be fixed by a professional, but major structural damage usually means it’s time for a new rim. Better to replace a questionable rim than risk a blowout on the trail.
Is there a difference between tubeless and tube-type ATV tires when changing them?
Most modern ATVs use tubeless tires, meaning there’s no inner tube—just the tire sealing against the rim. If you do have tube-type tires, you’ll need to be cautious not to pinch or puncture the tube during installation. Also, you typically want to replace the tube whenever you replace the tire to prevent leaks or failures from an old, worn tube.
